Exiting Movements
What is it?
Exit conditions are how EZ-Template decides it's time to move on from a motion. This is like putting your code in a while loop until you've reached your target.
chassis.pid_drive_set(24_in, 110);
while (true) {
  if (robot_reaches_target()) {
    break;
  } else {
    // keep running because we're not there yet!
  }
  pros::delay(ez::util::DELAY_TIME);
}
Once the robot has "exited" the PID does not stop running. EZ-Template will constantly run the PID in the background. "Exiting" just means that the code is free to move on to the next task, which could mean intaking, raising a lift, or continuing onto the next drive motion.
pid_wait()
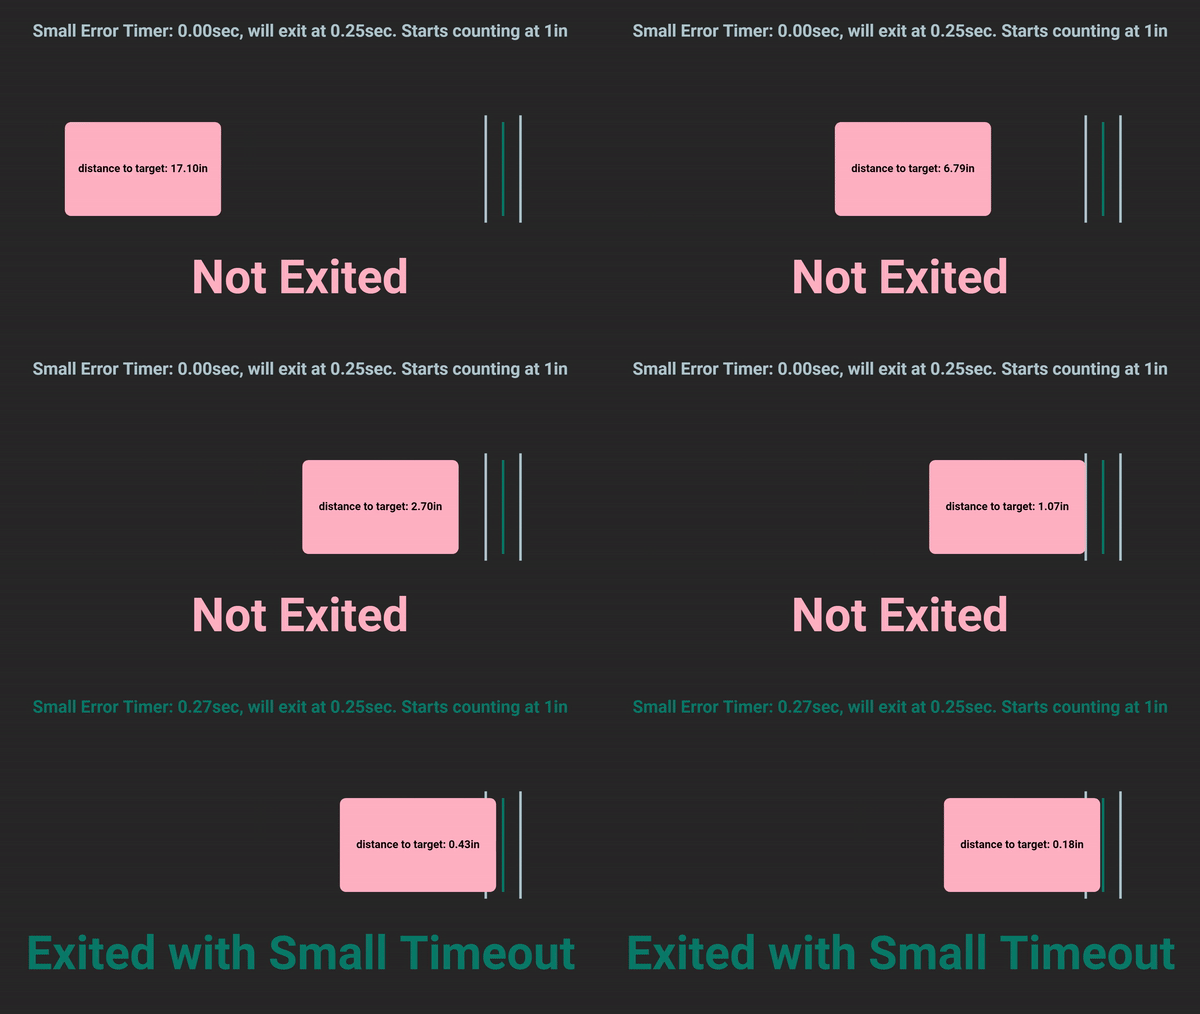
EZ-Template's exit conditions are a little more special than the code above. We run timers to tell how long the robot has been within X of your target, and then exit once it's reached a threshold you've set. This is what our exit conditions look like at their simplest.

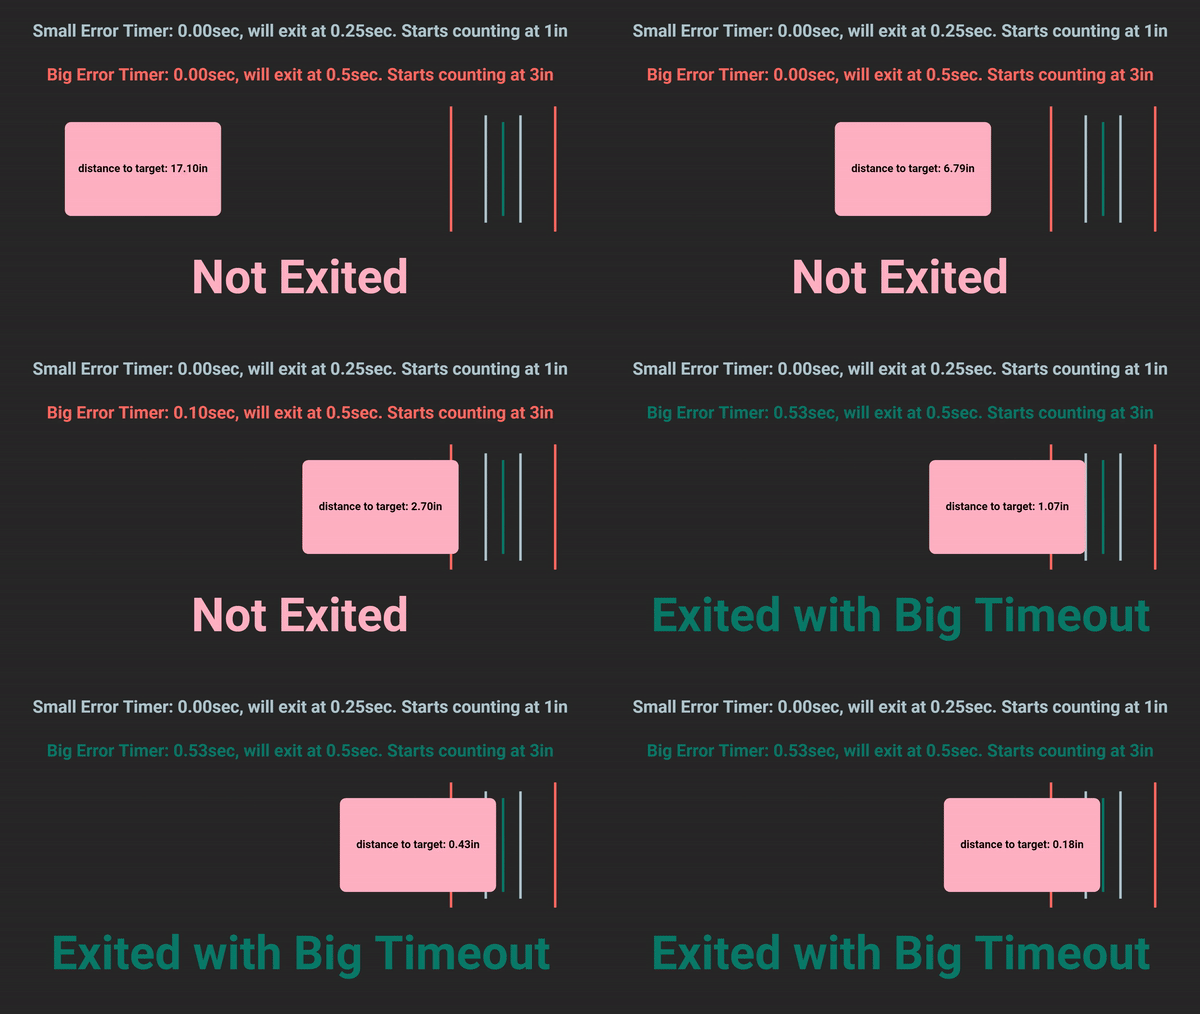
You can add another layer to this where it'll also check for a larger area. Now 2 timers will run, one when you're within X of target and one when you're within Y of target.

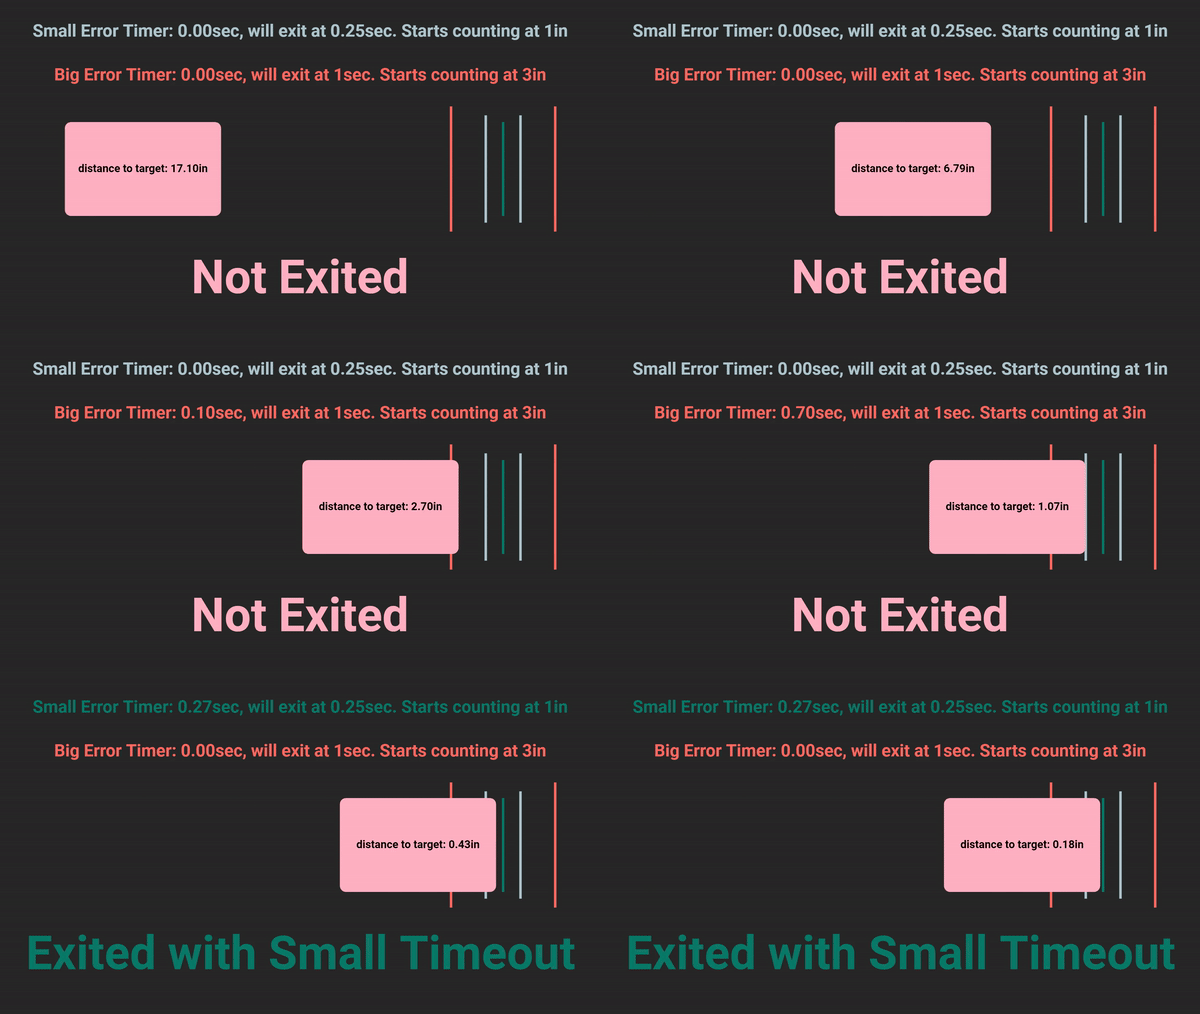
But when the robot enters the smaller exit zone, the big timer will not continue. If the big timer was not reset to 0 and we overshot target, big timer would be starting from a very high number and we would exit before correctly confirming the robot has settled. This can be seen here.

There are two more exit timers that you can add that are intended to be failsafes for when the previous two don't trigger. One timer will start to increase when the velocity of the robot is 0, so if the robot is still for too long it'll exit. Another timer will start once the robot sees it's pulling on the motors too hard (ie, you're fighting your opponent for a mobile goal), and if it's doing this for too long it'll exit.
pid_wait() will be your safest way to exit, but with that, it's also going to be the slowest way to exit.
chassis.pid_drive_set(24_in, 110);
chassis.pid_wait();

chassis.pid_turn_set(45_deg, 90);
chassis.pid_wait();

chassis.pid_swing_set(ez::RIGHT_SWING, 0_deg, 90);
chassis.pid_wait();

chassis.pid_odom_set({{0_in, 0_in}, rev, 110);
chassis.pid_wait();
pid_wait_quick()
pid_wait_quick() is exactly the same as writing the code below. It will pid_wait_until(target) but it'll replace target with wherever the last target you set was. This way of exiting has a chance at being faster, because if the robot overshoots at all then the code will exit. If you undershoot then it'll be as if you ran a normal pid_wait().
The two examples below do the same thing.
- pid_wait_until()
- pid_wait_quick()
chassis.pid_drive_set(24_in, 110);
chassis.pid_wait_until(24_in);
chassis.pid_drive_set(24_in, 110);
chassis.pid_wait_quick();
pid_wait_quick_chain()
pid_wait_quick_chain() is your fastest way of exiting. The code below is what happens internally. You will tell the robot to go 24 inches, internally X will get added to target, and pid_wait_until() will get called with the target YOU entered.
The two examples below do the same thing.
- pid_wait_until()
- pid_wait_quick()
chassis.pid_drive_set(27_in, 110);
chassis.pid_wait_until(24_in);
chassis.pid_drive_chain_constant_set(3_in);

chassis.pid_drive_set(24_in, 110);
chassis.pid_wait_quick_chain();
While being the fastest way of exiting, this should be used carefully to avoid inconsistencies. Make sure your PID is well-tuned and do enough testing that you're confident your results are consistent.
pid_wait_until()
pid_wait_until() is very similar to typing the code below. This code will exit as soon as the robot has traveled 6 inches.
double first_value = chassis.drive_sensor_left();
chassis.pid_drive_set(24_in, 110);
while (true) {
double distance_traveled = chassis.drive_sensor_left() - first_value;
  if (distance_traveled > 6.0) {
    break;
  } else {
    // keep running because we're not there yet!
  }
  pros::delay(ez::util::DELAY_TIME);
}
EZ-Template does a little more than just this though. What if the robot never reaches 6 inches? All of the normal exit conditions still run underneath pid_wait_until(). So if the robot has 0 velocity for long enough, your robot will not be stuck there.
The intended use case for this is if you want to do stuff during drive motions. Now you can decide exactly when you want to, and after you've traveled 6 inches you can have your intake start spinning!
Driving
This will wait until the robot has driven 6 inches, then it will increase its max speed to 110. Then it will wait for the motion to complete.
chassis.pid_drive_set(24_in, 30);
chassis.pid_wait_until(6_in);
chassis.pid_speed_max_set(110);
chassis.pid_wait();
Turning
This will wait until the robot has gone 22.5 degrees, then it will increase its max speed to 110. Then it will wait for the motion to complete.
chassis.pid_turn_set(90_deg, 30);
chassis.pid_wait_until(22.5_deg);
chassis.pid_speed_max_set(110);
chassis.pid_wait();
Swinging
This will wait until the robot has gone 22.5 degrees, then it will increase its max speed to 110. Then it will wait for the motion to complete.
chassis.pid_swing_set(ez::LEFT_SWING, 90_deg, 30);
chassis.pid_wait_until(22.5_deg);
chassis.pid_speed_max_set(110);
chassis.pid_wait();
Odometrying
For odometry motions, the same example used above cannot be used. This is what has to be written to get that behavior.
chassis.pid_odom_set({{{0_in, 6_in}, fwd, 30},
                      {{0_in, 24_in}, fwd, 110}},
                      true);
chassis.pid_wait();
pid_wait_until() still exists for odometry, we'll just have to pretend an intake is spinning.
Here, the robot waits until the robot has driven 6 inches, then it will start the intake spinning. Then it will wait for the motion to complete.
chassis.pid_odom_set({{0_in, 24_in}, fwd, 110});
chassis.pid_wait_until(6_in);
intake.move(127);
chassis.pid_wait();
Here, the robot waits until the robot has driven passed (0, 6), then it will start the intake spinning. Then it will wait for the motion to complete.
chassis.pid_odom_set({{0_in, 24_in}, fwd, 110});
chassis.pid_wait_until({0_in, 6_in});
intake.move(127);
chassis.pid_wait();
pid_wait_until_index()
pid_wait_until_index() is basically the same as pid_wait_until({point}), except you're giving it an index in your pure pursuit instead of a point. The two examples below do the same thing.
- pid_wait_until_index()
- pid_wait_until()
chassis.pid_odom_set({{{0_in, 24_in}, fwd, 110},
                      {{12_in, 24_in}, fwd, 110},
                      {{24_in, 24_in}, fwd, 110}},
                     true);
chassis.pid_wait_until_index(1);  // Waits until the robot passes 12, 24
Intake.move(127);
chassis.pid_wait();
chassis.pid_odom_set({{{0_in, 24_in}, fwd, 110},
                      {{12_in, 24_in}, fwd, 110},
                      {{24_in, 24_in}, fwd, 110}},
                     true);
chassis.pid_wait_until({12_in, 24_in});  // Waits until the robot passes 12, 24
Intake.move(127);
chassis.pid_wait();
pid_wait_until_index_started()
This function is a little different to the ones above. This exits once the input point becomes the target. This is a key difference, as instead of starting to spin the intake at {12, 24}, this code will have the robot starting to intake earlier so by the time it's at {12, 24} it's already intaking.
chassis.pid_odom_set({{{0_in, 24_in}, fwd, 110},
                      {{12_in, 24_in}, fwd, 110},
                      {{24_in, 24_in}, fwd, 110}},
                     true);
chassis.pid_wait_until_index_started(1));  // Waits until 12, 24 becomes the target point
Intake.move(127);
chassis.pid_wait();